You are here
Submission Management in Sage Track
- Manuscript Information Overview
- Audit Trail Overview
- Unsubmitting a Manuscript
- Editing Manuscript Files
- Adding Manuscript Flags and Notes
- Withdrawing a Manuscript
- Extending Manuscript Due Dates
- Using the Companion Papers Tool
- Rescinding a Decision
- Email Templates
- Turning Off Reminder Emails
Manuscript Information Overview
Manuscript Information contains a record of tasks that have been completed by authors, reviewers, and admins/editors. Each manuscript, including revisions, will have its own record. The page will expand as more tasks are competed.
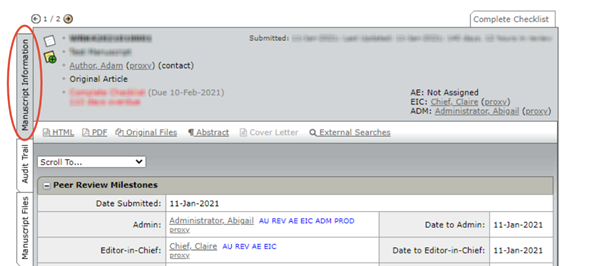
Default Categories
The following categories appear on all manuscripts. Please note that the latter three (Assign to Issue, Companion Papers, Flag This Manuscript) will move to the bottom of the page as more categories become available, while all others remain at the
Peer Review Milestones
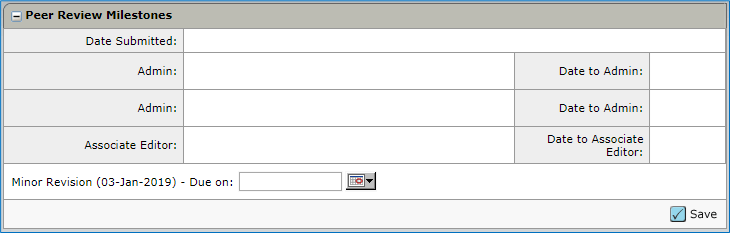
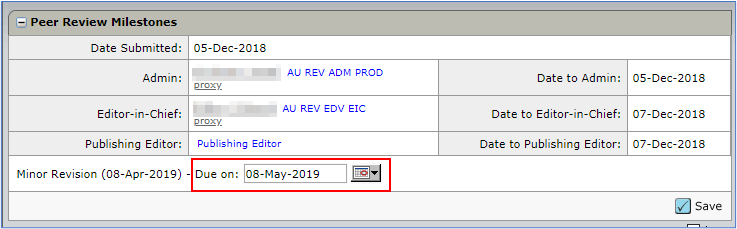
Peer Review Milestones provides a timeline detailing when each user was assigned in a certain administrative or editorial role. If a manuscript is awaiting revision, you will be able to extend the due date using the “Due on:” box and clicking “Save.”
Version History
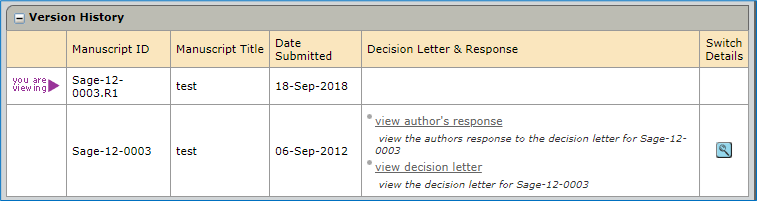
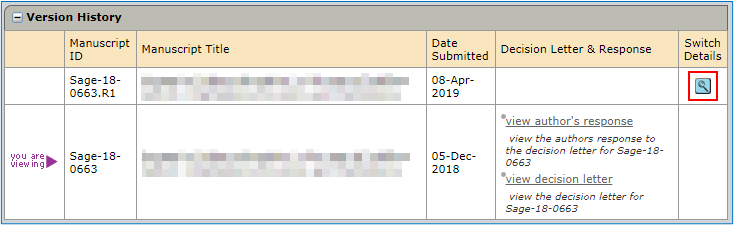
This section stores the at-a-glance details of all revisions a manuscript has received. The purple “you are viewing” icon indicates the version of the manuscript you are located in. You may toggle to another version by clicking “Switch Details.” This will take you to the selected version’s Manuscript Details page, though you could also toggle to the Audit Trail and Manuscript Files tabs as needed.
Author-Supplied Data

Author-Supplied Data allows you to view and modify information provided by the author during the submission process.
Assign to Issue

Blank by default, the Assign to Issue populates based on information entered in the Production Center Issue tool (optional). This information does not export to production, so it is only used for internal editorial tracking.
Companion Papers

The Companion Papers tool allows editors and admins to link manuscripts together. It is typically used to track duplicate submissions, revisions that have been submitted as a new manuscript rather than a revision, or resubmissions. Clicking “Search for a Companion Paper” will generate a screen where the manuscript in question can be selected. Once a manuscript has been added as a Companion Paper, this category functions similarly to Version History.

Flag this Manuscript

Once a manuscript has been flagged, the selected icon appears in front of the ID across Sage Track. Flags can be labelled by a member of the Sage Track team to indicate their individual purposes. The purpose of each flag is determined by the Journal’s editorial team.
Status Specific Categories
Immediate Decision

An Immediate Decision box may appear on in-process manuscripts depending on the site’s workflow. This allows the editor/admin to make a decision without sending the manuscript to review. If a manuscript has received reviews, please use the standard “Make Decision” task to make a decision.
Admin Checklist

A copy of the Admin Checklist will be visible, and editable, once complete.
Forward to Admin/Editor and Admin/Editor List

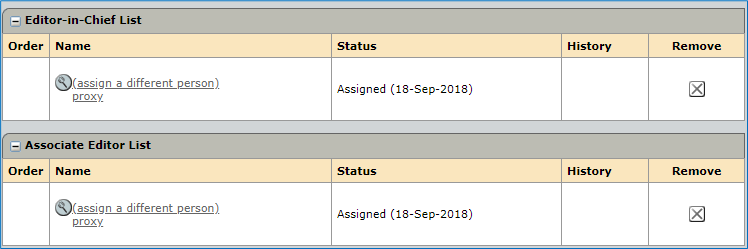
These sections will appear depending on the site’s configuration settings. If present, you will be able to view or reassign the Admin or Editor assigned to the manuscript. Please note that this is only available for in-process manuscripts; manuscripts with decisions cannot be reassigned to another user for historical purposes.
Make Decision

A copy of the decision task will be available once completed. If necessary, the decision can be rescinded here as well.
Please note that other decision tasks such as Make Recommendation and Admin Approve Decision will also be available if present in the site workflow.
Production Checklist

A copy of the Production Checklist will be available, and editable, once completed.
The Copyright Form Received task is being moved out of Sage Track (into Sage Journals: Licensing & Payment) over the course of 2025. For journals that no longer have a Contributor form task the Copyright Form Received checkbox can be disregarded and will also be removed over the course of 2025.
Reviewer List
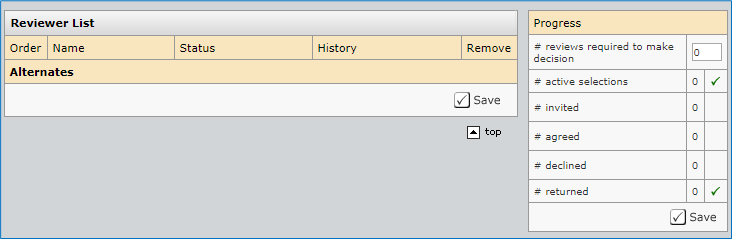
A copy of the reviewer list will be available. This will include reviewers who were selected, invited, assigned, invitation response records, and copies of the reviewer score sheets received.
Forms Tracking

Sage is removing the Contributor Agreement from Sage Track over the course of 2025.
For journals using Sage Track for contributor form signing: The contributor form will be visible. The form can also be rescinded if needed. Please note that the form must be submitted when exporting a manuscript to production. This section can also be used to officially check in the contributor form after the “skip for now” button has been used during Forms Tracking.
For journals that have had the contributor form task removed: The forms tracking section will only appear for manuscripts that have already been prompted to complete forms in Sage Track. Otherwise, any newly accepted papers will not have this section visible.”
Assign to Batch

A copy of the manuscript’s export history will be available. The manuscript can also be re-exported if needed.
Audit Trail Overview
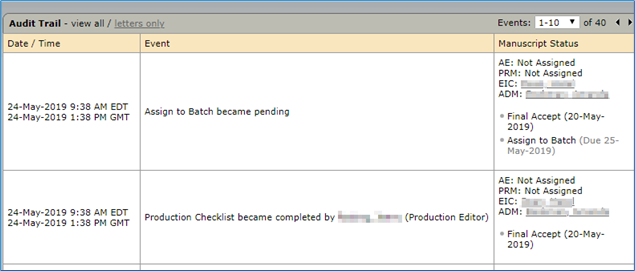
The Audit Trail provides an in-depth look at individual tasks that have been performed on a manuscript, including emails that have sent out through Sage Track.
The Audit Trail contains three main columns:
- “Date/Time” indicates when an action took place.
- “Event” displays the action and action performer.
- “Manuscript Status” will show the users who were assigned to the manuscript, decision (if applicable) and the task the manuscript was in when the action was performed.
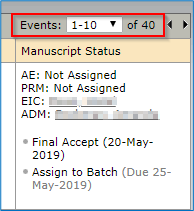
Events Dropdown
The drop down box or arrows next to “Events:” can be used to move to a different page. The Audit Trail will display the most recently completed tasks first.
View Correspondance History Only
To view all emails that have sent, click “letters only.” This will remove all other tasks and show emails exclusively. Clicking “all” will restore the full view.

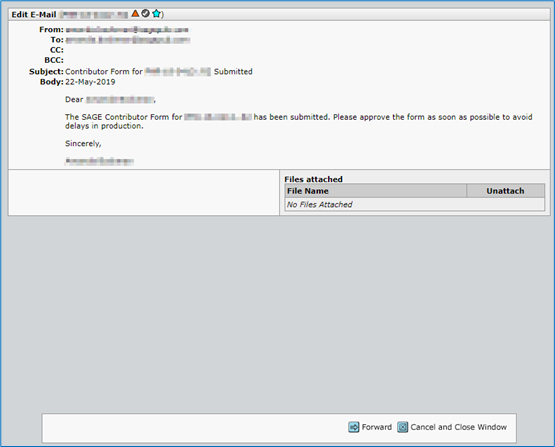
When viewing emails, the Event column will display the recipient and sender information, along with the subject and status (ie: “Successfully sent”.)

Clicking the envelope icon will generate a pop up window where you can see the body of the email.
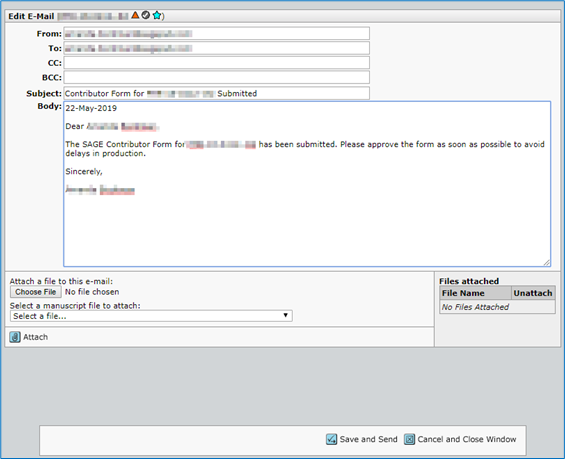
Resending/Forwarding Correspondance
If an email needs to be resent, clicking “forward” will open an editable version that can be modified or resent as-is by clicking “Save and Send.”
Enter Correspondance
Toward the bottom of the page, there is a heading labelled “Enter correspondence sent/received from outside of ScholarOne Manuscripts.” In the corresponding box, you have the option of inserting an email that was not sent via Sage Track into the audit trail by filling out the fields provided. Clicking “Save” will enter the correspondence into the Audit Trail in the location that matches the specified date and time.

Unsubmitting a Manuscript
If you’d prefer that the author make the changes to the manuscript, you can unsubmit the manuscript using one of two methods:
1.Use the “Unsubmit” button in the Admin Checklist.

2. Use the “Click here to unsubmit the manuscript” link available in the Manuscript Files tab, available on the left side of the submission entry. This option remains open after the Admin Checklis task is completed.

Both unsubmit options provide an editable email for the purpose of informing the author why their manuscript has been unsubmitted. Unsubmission sends the manuscript back to the Author Center so the author can make the requested changes and resubmit the manuscript. The manuscript will retain the originally assigned ID.
Please note that manuscripts should not be unsubmitted after reviewers have been invited. This will cause any reviewer data, including completed score sheets, to be lost.
Editing Manuscript Files
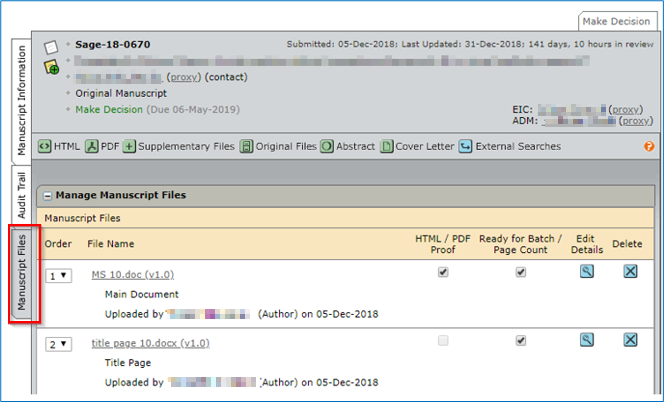
If you’d prefer to make the changes yourself, you can do so through the Manuscript Files tab.
To edit an existing file:
1. Enter Manuscript Files.
2. Click the file name of the document that requires editing. This will download the file to your computer, where it can be modified and saved using a word processing program.
3. Click the “Edit Details” icon corresponding with the edited document.
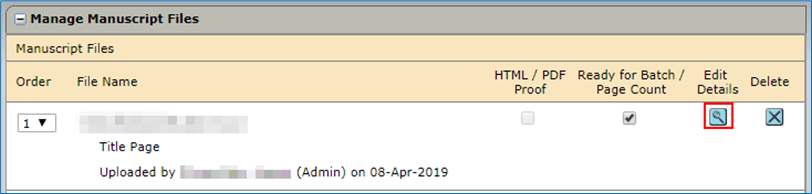
4. In the File Details window, upload the file using the “Upload later version of file” section. You may optionally leave comments or denote the new upload as a Minor Version or Major Version. Click “Save” once complete.
5. The new file will be added to the Version History. While the previous file will be retained for historical purposes, only the newest uploaded version will be viewable to reviewers.
a. If the previous version still appears when viewing the manuscript PDF proof, please clear your browser cache or log out of Sage Track and log back in.
To upload a new file:
1. Use the Upload File(s) button to select a new file
2. Select the appropriate File Designation from the dropdown list.
a. Please note that the Review File, Recommendation File, and Decision File designations are not intended for manuscript files. Instead, please use Title Page, Main Document, Figure, and so on.
3. Click “Upload” and “Save.”


4. The new file will appear in the file list and pull into the PDF proof if applicable. If the file does not appear, please ensure that the “HTML/PDF Proof” box is checked, then clear your browser cache or log out and back in. The Order dropdown can be used to determine where the new file should appear in the proof if needed.

Please note that files should not be modified by uploading the updated document and deleting the previous version. When modifying an existing document, please use the instructions listed in “To edit an existing file.” The new file upload tool should only be used to add files that had not been previously uploaded by the author.
Adding Manuscript Flags & Notes
Manuscript Flags
Sage Track Clarivate (STC) provides 10 color flags that can be used to flag manuscripts for easy identification “at-a-glance.”
Manuscript flags are available on a submission’s Manuscript Information tab by scrolling to “Flag This Manuscript.”

For example, the journal below includes labels for “Special Collection Paper,” “Editor Waiver Applies,” “See notes for discount instructions,” and “Requires re-review/additional review.”
However, these flags will remain unlabeled unless otherwise specified. To update flag labels, please reach out to SageTrackSupport@sagepub.com.
You can use multiple flags by selecting more than one from the checklist.
Once flagged, the colored flags will appear after the Manuscript ID in the manuscript header and be used to create custom reports.

NOTE: Flags can be configured to have the ability to carry over to revisions and to attach files. Please reach out to SageTrackSupport@sagepub.com for more information.
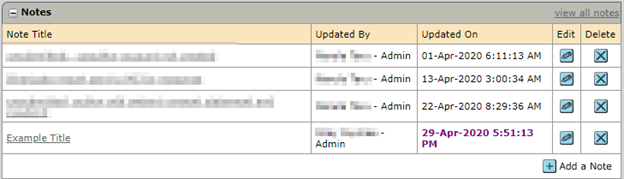
Adding & Viewing Notes
Notes are only viewable to the Admin and Editor roles. Authors and Reviewers will not see the notes section.
Notes appear at the bottom of each tab within a submission’s Manuscript Details. See the image below (pulled from the ScholarOne guide) for more information.

Adding a Note
Click the Add a Note icon ( ) in the manuscript header. The Add a Note screen will display.
Alternatively, you can access this by scrolling to the Notes section and clicking  .
.

Enter your preferred Title and Note text. Save.
Accessing & Editing Existing Notes
Notes appear at the bottom of the Manuscript Details page on all tabs.
You can Add(), Edit ( ), or Delete (
 ) notes via this section.
NOTE: Notes can be configured to have the ability to carry over to revisions and to attach files. Please reach out to SageTrackSupport@sagepub.com for more information.
Withdrawing a Manuscript
Occasionally, authors may request to remove their manuscript from review. Because authors are unable to withdraw their own manuscripts, this must be done by a site admin. If you do not have Admin access or access to the “Manuscript Files” tab, please reach out to Sage
To withdraw a manuscript from Sage Track, please follow the steps below.
1. Locate the Manuscript via Quick Search
In the Admin Center, the quickest way to locate the manuscript is to perform a search in the Quick Search available on the right side of the page.

Please note that the manuscript can also be located in the Admin Lists, to the left.
2. Enter the Manuscript Files page
When the search results appear, select “View Manuscript Files” from the Take Action drop down bar.

You will be taken to the Manuscript Files page. Please note that this page may also be reached using the Manuscript Files tab on the left side of the manuscript entry.
3. Locate "Change Manuscript Status"
Once in the manuscript’s Manuscript Files page, scroll to the Change Manuscript Status box. “Click here to withdraw the manuscript” is the second link.

4. Additional Notes
- There is currently no way to rescind a withdrawal; if a manuscript is mistakenly withdrawn, please contact a member of the Sage Publications peer review team for assistance.
- Manuscript withdrawals do not impact the journal decision ratio, although the time to review (if reviews have been received) and time to decision (if a decision has been made) will be counted in the site’s turnaround time statistics.
- Once a manuscript is withdrawn, it can no longer be found in the Admin or Editor Lists. However, it can still be viewed by performing a manuscript search.
Extending Manuscript Due Dates
If an author requires additional time to submit a revised manuscript, their due date can be extended. This will allow the author to follow the standard revision process, rather than submitting their revised manuscript as a new submission with a new ID.
Manuscript due dates can be found in the “Peer Review Details” box of the “Manuscript Information” tab. To find these, follow the instructions below.
1. Enter the Admin Center

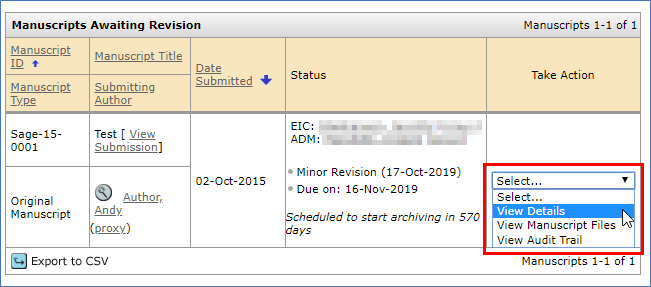
2. Locate the manuscript using the Quick Search or “Manuscripts Awaiting Revision” queue.
Please note that manuscripts are removed from Manuscripts Awaiting Revision once the revision due date has passed. These submissions can still be located via search.

3. Once you have located the manuscript, click the dropdown under “Take Action” and select “View Details.”

4. The due date can be found in “Peer Review Milestones.” This date can be altered by typing directly into the white box or using the calendar applet on the right to select a new date.
Notes
- The editable due date box only appears on the most recent version of the manuscript. If the option to change the due date is not available, scroll to “Version History.” Use the “Switch Details” button to toggle to the newest version. The newest version will be located first on the list.
- Due dates can only be extended in journals that utilize revision due dates. If this box is unavailable in the newest version of the manuscript and the revision has not been submitted, it is possible your journal is not utilizing due dates. In this case, please contact your Sage Track Support representative for further information.
Using the Companion Papers Tool
Occasionally, an author will submit a revised manuscript as a new document and this document will be inadvertently processed. Other times, an author will re-submit a manuscript that had previously been rejected. In these situations, the Companion Papers tool can be used to link the two manuscripts together for easy reference.
1. Locate one of the manuscripts you would like to link and click “View Details” under the Take Action selection drop down.

2. Scroll to Companion Papers and click “Search for a Companion Paper.”

3. In the new window, locate the manuscript that should be linked by performing an advanced search, then click the “Search” button at the bottom of the page.

4. When the results appear, click the blue icon under “Use this Paper” to link the manuscript.

5. When the page refreshes, you will see a new icon ( ) appear at the top of the manuscript. This icon will appear on both of the linked manuscripts. Clicking this icon will take you to the “Companion Papers” box in Manuscript Information.

6. In “Companion Papers”, you will see the details of the manuscript this submission is linked to. You can also view the manuscript proof (“View Submission”), toggle to the Manuscript Information page of the companion paper (“View Details”), delete the listing, or search for a new companion paper.

Rescinding a Decision
If a decision has been made in error or an author has appealed the original decision made on their manuscript, you may undo the previous decision and select a new one in its place. You may send the manuscript back to reviewers if desired.
The “Contents” below contain an outline of the process; further information can be found beneath each heading, starting on page 2.
Please note that this tool is not intended to replace the revision workflow. If a manuscript requires a new decision after content changes have been made by the author, this new version should be submitted as a revision and a new decision rendered.
Enter the submission's Manuscript Information page
1. Search for the manuscript by ID, title, or author name using the Quick Search feature.

2. When the search results appear, select “View Details” in the “Take Action” drop down menu.
3. This page is also available within the submission by clicking the “Manuscript Information” tab.

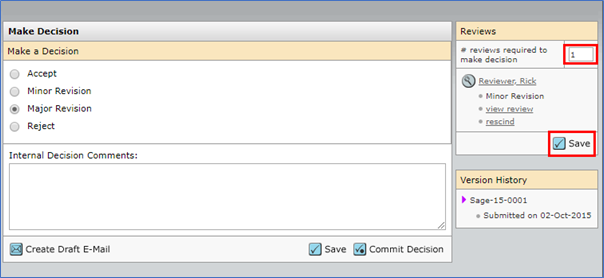
In the "Make Decision" box, use the button labelled "Rescind."
4. The Make Decision box can be found toward the middle or end of the page. The “Scroll To…” dropdown box at the top of the page can be used to locate this box without scrolling.

5. Click the “Rescind” button, located on the top right side of the Make Decision box.

6. A pop-up window will appear. Click “OK.”

7. An email template will appear alerting the author that the decision has been rescinded. Make edits to the text if desired, then click “Save and Send.”

Commit a new decision using the "Make Decision" task.
8. After sending the “Decision Rescinded” notification, the page will refresh and return to the “Make Decision” task.
9. Click the radio button that corresponds with the new decision.

10. A confirmation pop-up will appear indicating that a new decision letter must be drafted. Click “OK.”

11. Click “Commit Decision.”

12. Make edits to the decision letter text if desired, then click “Send and Commit Decision.”

Additional Options
- If additional reviews are necessary before making a new decision, you may increase the number listed in “# reviews required to make decision” and click “Save” to return to the Select Reviewers step.
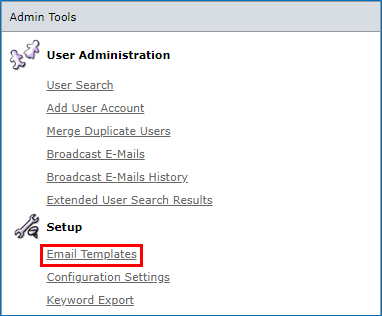
Email Templates
Finding and Navigating E-mail Templates
Where to Find
The E-Mail Templates can be found in your Admin Dashboard, under ‘Admin Tools’. After clicking ‘Email Templates’ you will be taken to the templates, where you can select the area.
Select Area
The templates are separated in to categories, and you can navigate these using the ‘Select area’ drop-down list.

- Hyperlink E-Mail: the templates used when a user name is clicked on. These should usually be blank.
- System E-Mails: contains automatic e-mails sent at various stages in the process, from ‘Account Created’ to ‘Manuscript Exported’.
- Decision Letters: all decision letters sent to authors and/or reviewers.
- Invitation E-Mails: letters sent to reviewers to invite them to review a manuscript.
- Invitation Response E-Mails: the automatic response e-mails following a reviewers invitation response.
- E-Mail Notifications and Reminders: contains all the reminders sent to editors and reviewers for tasks assigned to them.
- Author Reminders: contains reminders sent to author for resubmissions.
- Printable E-Mail Letterhead: not in use.
Commonly Edited Templates
The template areas most often used are:
- Decision Letters
- Invitation & Invitation Response E-Mails
- E-Mail Notification and Reminders
View and Modify Templates
Edit Templates
To view and modify an e-mail template, use the ‘Modify’ button as shown below. This will open a new window (pop-ups will need to be allowed in your browser). The e-mail will need to be edited in both the Submitted Workflow (new manuscripts) and Revised Workflow (manuscripts that were sent back to authors for revision and have since been resubmitted).
For example, to change the Accept Decision letter you would need to modify the SW (submitted workflow) template and then the RW (revised workflow) template.

Using the ‘Modify’ button will open a new e-mail window, where you can view and edit the e-mail. The top half of the window will show a preview of the current e-mail, and the bottom half includes the editable e-mail template. Here, you can change the wording or add/remove e-mail tags as needed. To view all the e-mail tags, click ‘View E-Mail Tags’.
Once you are finished with editing, click ‘Save and Preview’ to check your changes.

Create New Template or Add Task Related E-Mail
To create a new template, go to the area and task you’d like to add to and click ‘add template’. For example, to add a new Invitation E-Mail, go to ‘Invitation E-Mails’ and click ‘add template’ next to the related task.

This will open a blank e-mail window where you will need to add the e-mail body, To and From fields and the Subject. You will also need to name the template, following the other title formats of ‘SW -…’ or ‘RW -…’.

The ‘From’ and ‘To’ fields will need to use the corresponding tags, and the ‘Subject’ and ‘Body’ can use text with tags. To find the corresponding tags, use the ‘View E-Mail Tags’ button or reference related e-mail templates.

Once the new template has been saved, it will appear under the task. To make the template available, tick ‘Active’.
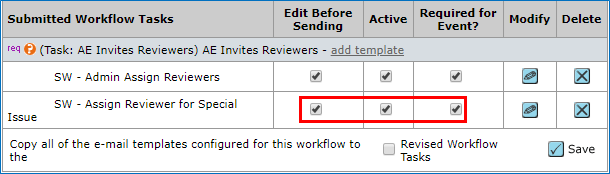
For task related e-mails, tick ‘Edit Before Sending’ and ‘Required for Event’. This will allow the editor to select which template they want to use when it generates. Add the template to the Revised Workflow as needed.
Using E-mail Tags
The e-mail tags are used in the templates to generate the relevant information for each manuscript, and using them also ensures that the correct Admin and EIC contacts will be used following editorial transitions.
E-mail Tags can be found by opening any e-mail template and clicking ‘View E-Mail Tags’. This will open a new window that lists all the tags available on the site.
Each tag also has a brief description of the information it will generate, so when looking for a specific tag use Ctrl+F to find a match.
Admin & EIC Contact Tag
The Admin and EIC contact tags will pull the name and e-mail address of the users listed in the Admin Configuration settings.

The Admin contact tags:
- ##EMAIL_CONTACT_ADMIN_CENTER_EMAIL##
- ##EMAIL_CONTACT_ADMIN_CENTER_NAME##
The EIC contact tags:
- ##EMAIL_CONTACT_EIC_CENTER_EMAIL##
- ##EMAIL_CONTACT_EIC_CENTER_NAME##
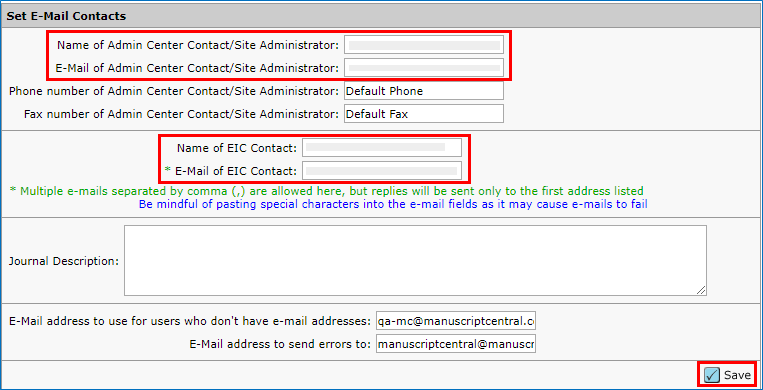
Changing Admin or EIC Contact
The Admin and EIC contact should be changed during editorial transitions, or when a new Admin or EIC takes over the role.
To change the contact, go to the Admin Configuration Settings and scroll down to Set E-Mail Contacts. Update the name and e-mail address of the corresponding user and click Save.
Reminder Timescales
The site will send out reminder emails for certain tasks, and most of these timeframes can be edited from within the e-mail templates.
Reviewers will receive invitation response reminders following the initial invitation to review. These are usually 3 and 5 days following, but these timescales can be edited in ‘Admin Configuration’.
Reviewers and Editors will also receive task related reminders, which can be found in ‘E-Mail Notifications and Reminders’.
The reminders are triggered by one of two fields, When Task Enters or Reminder Days.

When Task Enters will trigger the e-mail to send when one of the following is selected:
- Pending (task has started)
- Processing (task in process but not complete)
- Overdue (task has reached due date)
- Completed (task completed)
- Abandoned (action no longer needed, but task still open)
- Rescinded (manuscript moved back from step)
Or, a specific timeframe can be selected by entering the number of days before or after the task begins to send the reminder.
An example of these triggers is in the Reviewers Score task, as shown below. The ‘-7’ indicated that the ‘Reviewer Score due in 1 week’ e-mail should send 7 days before the task is due. The ‘7’ indicates that the ‘Reviewer Scores are 1 week late’ e-mail should send when the due date is 7 days passed but the task has not been completed.

The ‘Overdue’ field will trigger the ‘Reviewer Scores now due’ e-mail to send on the day the review is due. The ‘Completed’ field indicates that the ‘Thank you for submitting your review’ e-mail should send when the reviewer has returned their review, therefore completed the Reviewer Score task.
Download .xml Templates
It’s recommended that e-mail tags are used to populate names and e-mails, rather than typing them directly in to the templates.
This means that when a user role is updated, the e-mail templates will automatically be updated. If there is an instance where a name or e-mail address has been hardcoded in to the templates, you can find the templates to edit by downloading an .xml of all the templates. This option is at the bottom of the E-Mail Templates, in ‘E-Mail Tools’.

Once this file has been opened, you can use Ctrl+F to search for specific names, e-mail addresses or phrases and make a note of the templates they appear in to then edit on the site.
Note: please do not edit within the .xml and re-upload as this can cause duplications and errors. Only edit within the Modify Template window.
Turning Off Reminder Emails
If your journal Editorial team regularly check queues and therefore do not require the system generated prompts and reminders, follow the below guidance to de-activate them.
To turn off reminder emails, go into the ‘Admin Centre’ dashboard and scroll down to the ‘Admin Tools’ section and select ‘Email Templates’.

You will be directed to a new page where you will need to select the ‘Email Notifications and Reminders’ tab from the ‘select area’ drop-down menu.

Starting with the ‘Submitted Workflow Tasks’, search for email reminders that are currently set up to go out to the Admin role and uncheck the ‘active’ box.

Once inactivated, scroll to the bottom of the ‘Submitted workflow Tasks’ section and click ‘Save’.

Please note: reminders to EIC/ AE/ Editor roles and reviewers should not be made inactive unless previously discussed with your Publishing Editor.
You will then need to repeat the same process for the ‘Re-submitted Workflow Tasks’ (if applicable), ‘Revised Workflow Tasks’, and the ‘Accept Workflow Tasks’, remembering to click ‘Save’ after you have inactivated any templates.


Email reminders you may want to consider inactivating:
Submitted, Resubmitted and Revised Workflow templates:
-Awaiting Checklist Completion
-Awaiting EiC assignment
-Awaiting AE Assignment
Accepted Workflow templates:
-Awaiting Production Checklist
-Awaiting Assignment to Batch
-Notice to Admin: Form is now due